Acrylic Pour Painting: A Complete Beginner's Guide to Fluid Art

What Supplies Do You Need to Start Acrylic Pour Painting?
The foundation of any successful pour painting comes down to four basics: fluid acrylic paints, a pouring medium, canvases or panels, and something to catch the mess. That's it. You don't need a studio in Brooklyn or an MFA to create stunning fluid art. Start with Liquitex Basics acrylic paints—they're affordable, readily available at Michaels or Blick, and thin down beautifully for pouring. For a step up in vibrancy, Golden Fluid Acrylics offer professional-grade pigments that won't fade over time.
The pouring medium is what transforms regular paint into liquid magic. Liquitex Pouring Medium remains the gold standard for beginners—it's predictable, self-leveling, and dries crystal clear. Floetrol, a paint conditioner found at hardware stores like Home Depot, costs roughly a third of art-store mediums and works nearly as well. (Some artists actually prefer it for creating cells—those cellular patterns everyone loves.) You'll mix roughly one part paint to two parts medium, though ratios vary by brand.
Surfaces matter more than beginners realize. Stretched canvas works, but it will sag under heavy paint loads. Canvas boards or Ampersand Gessobord panels provide rigid support that won't warp. For practice, grab a pad of Canson XL Mix Media paper—it's cheap, and you'll want to burn through dozens of attempts before showing anyone your work. Don't forget plastic cups for mixing, wooden stir sticks, and a level surface covered in a plastic drop cloth. This gets messy. Embrace it.
How Do You Set Up for an Acrylic Pour Painting Session?
Preparation takes longer than the actual painting—and that's fine. Cover your table with a thick plastic sheet or contractor-grade drop cloth from Harbor Freight. Raise your canvas on plastic cups or push pins stuck into the back corners so excess paint can drip off freely. Level your surface using a small bubble level; uneven pours slide and pool in ways you can't control.
Mix your paints in disposable cups, adding the pouring medium first, then paint, then stirring slowly to avoid bubbles. (Bubbles ruin finishes. Patience here pays off.) Let mixtures sit for five minutes so air can escape. Line up your colors in the order you'll use them—this prevents the frantic mid-pour scramble that ruins everything.
Wear clothes you hate. No, really—acrylic stains permanently. Disposable nitrile gloves keep your hands clean, and a respirator isn't necessary for acrylics but helps if you're sensitive to fumes in enclosed spaces. Keep paper towels within arm's reach. The chaos is coming. You'll be ready.
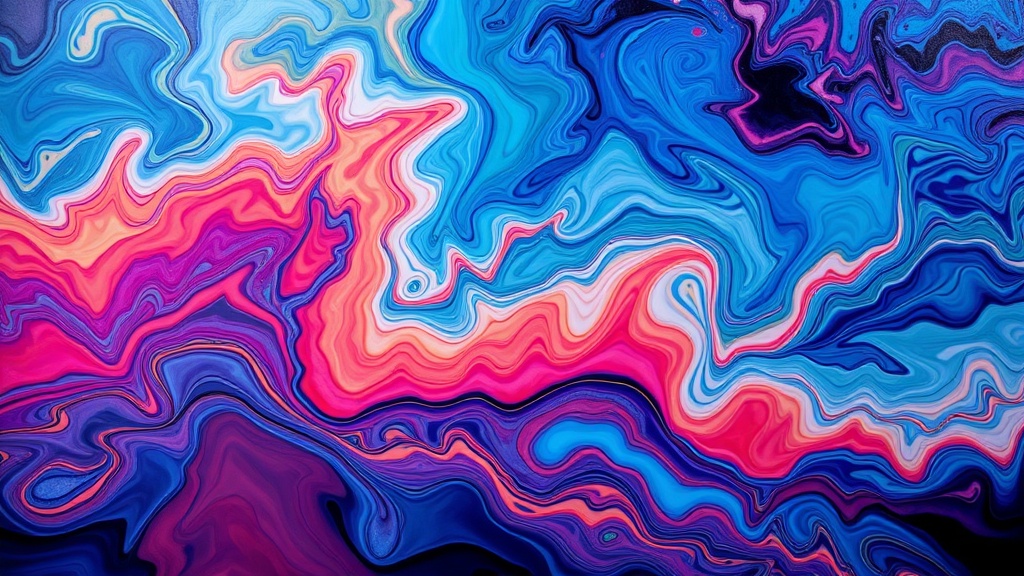
What Are the Basic Acrylic Pour Techniques for Beginners?
Four techniques will carry you through months of exploration: dirty pour, flip cup, swipe, and ring pour. Each creates radically different results using the same materials.
The dirty pour involves layering multiple colors in a single cup, then pouring that mixture onto your canvas in lines or spirals. Colors blend organically, creating marble effects and soft transitions. Tilt the canvas gently—aggressive tilting mixes everything into mud.
Flip cup takes the dirty pour further. Layer your paints in a cup, place the canvas on top, flip both together, then lift. Paint flows outward in explosive bursts, often creating dramatic cells where silicone-enhanced colors react. (Add two drops of 100% silicone treadmill belt lubricant to one color for guaranteed cell action.)
The swipe technique produces stunning wave effects. Pour your base color across the canvas, add accent lines of contrasting colors, then drag a wet paper towel, offset spatula, or piece of plastic wrap across the surface. The dragging motion pulls colors into feathered, flame-like patterns.
Ring pour demands steady hands. Pour from a height, moving your hand in small circles so paint lands in concentric rings. Each ring maintains its color identity longer, creating target or tree-ring effects. This technique wastes more paint—excess runs off the edges—but the visual impact justifies the sacrifice.
| Technique | Skill Level | Cell Potential | Paint Usage | Best For |
|---|---|---|---|---|
| Dirty Pour | Beginner | Medium | Moderate | Marble effects, soft blends |
| Flip Cup | Beginner | High | Moderate | Bold patterns, dramatic cells |
| Swipe | Intermediate | Low | Low | Waves, feathers, controlled designs |
| Ring Pour | Intermediate | Low | High | Concentric patterns, color separation |
| Dutch Pour | Advanced | Medium | Moderate | Cloud effects, floral shapes |
Why Do Acrylic Pours Crack and How Do You Prevent It?
Cracking happens when the top layer dries faster than the bottom layer, creating tension that splits the surface. The fix? Control your paint thickness and drying environment. Pours should be roughly 1/8 to 1/4 inch thick—thicker layers trap moisture underneath for days, guaranteeing cracks.
Avoid directing fans at wet paintings. Air circulation helps prevent dust settling, but direct airflow accelerates surface drying while the depths remain wet. Paint in a room around 70°F with moderate humidity. (Bathrooms and kitchens, with their humidity swings, make terrible pour studios.)
The pouring medium you choose affects cracking risk. Cheap all-purpose mediums contain more water, which evaporates unevenly and causes crazing—the fine spiderweb cracks that ruin finishes. Stick with dedicated pouring mediums from Liquitex or Golden for reliable results. If cracks appear anyway, sand the area lightly and pour a thin resin coat over the finished piece. It hides imperfections and adds gallery-worthy depth.
How Long Does Acrylic Pour Art Take to Dry?
Touch-dry happens in 24 hours. Fully cured? Give it three weeks. Acrylic pour paintings dry from the outside in—the surface feels ready long before the interior stabilizes. Resist the urge to varnish or seal during that first week; you'll trap moisture and create cloudy finishes that never clear.
Environmental factors stretch or shrink these timelines dramatically. High humidity can extend drying to five days for the surface layer. Cold temperatures below 60°F slow acrylic polymerization to a crawl. If you're pouring in winter, invest in a small space heater for your work area—not pointed at the painting, just raising ambient temperature.
Worth noting: darker colors dry slower than light ones. They absorb more heat, stay fluid longer, and can slide even after the surrounding white areas have set. This differential drying causes the "mud" effect where colors bleed into unwanted territory. Pour dark accents last, or accept that some muddying adds organic character.
What About Varnishing and Finishing?
After three weeks of curing, seal your work to protect against UV damage and dust. Krylon UV-Resistant Clear Acrylic Coating provides affordable spray protection, though it requires multiple thin coats. For gallery presentation, Golden Polymer Varnish brushed on in thin layers creates a removable, conservator-friendly finish.
Resin pours elevate pieces to professional status—literally adding depth and glass-like clarity. ArtResin dominates the home market for good reason: it's non-toxic when used as directed, self-leveling, and resists yellowing for years. Mix equal parts resin and hardener, stir slowly for three minutes, then pour and spread with a plastic spreader. Torch briefly to pop bubbles. (A butane kitchen torch works; expensive art torches don't perform better.)
Here's the thing about finishing: it transforms amateur pours into sellable art. Skipping this step leaves your work vulnerable to dust, fingerprints, and the slow yellowing that degrades unprotected acrylics. Take the time. Future you—admiring that piece on your wall years later—will appreciate the effort.
Where to Learn More
The online pour painting community shares techniques freely. Mixed Media Girl's YouTube channel offers hundreds of technique tutorials with clear, jargon-free instruction. For supply reviews and side-by-side medium comparisons, AcrylicPouring.com maintains updated buyer's guides. Local art supply stores often host pour painting workshops—Blick and smaller independent shops provide hands-on guidance that videos can't match.
Your first ten pours will frustrate you. Colors will muddy. Cells won't appear. Paint will slide right off the canvas onto your shoes. That's the process. Every pour painter—whether selling pieces at local galleries or posting to Instagram—started with those same disasters. The difference between someone who quits and someone who creates something beautiful isn't talent. It's willingness to make the mess, clean it up, and try again tomorrow.