The Alchemy of Pigment: Hand-Crafting Your Own Watercolors

There is a specific kind of magic that happens when you stop buying art supplies and start making them. In the contemporary art world, we are often taught to view "professional grade" materials as a closed loop—a high-end, expensive standard that exists far above the reach of the hobbyist or the beginner. But I’ve always believed that the most profound connection to your medium comes from understanding its molecular soul. When you transition from a consumer to a maker of your own pigments, you aren't just preparing to paint; you are participating in a lineage of alchemy that spans centuries.
Hand-crafting your own watercolors—often referred to as "making your own paints"—is a practice that strips away the pretension of the art store. It replaces the sterile, plastic-wrapped certainty of a pre-made pan with the unpredictable, tactile joy of raw earth, minerals, and organic matter. It is the ultimate way to bridge the gap between the physical world and the canvas.
The Anatomy of a Watercolor Paint
Before we dive into the grit and the grinding, we need to understand what a watercolor actually is. At its core, a watercolor paint is a simple suspension of two primary components: a pigment and a binder. If you get this ratio wrong, you end up with either a gritty, unpaintable sludge or a transparent, weak wash that lacks character.
1. The Pigment: The Color Soul
The pigment is the finely ground substance that provides the color. In the modern era, we often rely on synthetic pigments, but the beauty of hand-crafting is the ability to use natural sources. This could be anything from ground lapis lazuli to ochres harvested from the earth, or even organic matter like charred wood or dried berries. The quality of your pigment determines the "tinting strength"—how much color it actually holds when diluted with water.
2. The Binder: The Structural Glue
The binder is what allows the pigment to stick to the paper and stay there once the water evaporates. For watercolor, the gold standard is Gum Arabic. This is a natural hardened sap from the Acacia tree. It provides the necessary viscosity and the slight sheen that characterizes professional watercolor. Without a proper binder, your pigment will simply flake off the paper like dust.
The Essential Toolkit
You do not need a laboratory to do this, but you do need a few specific tools to ensure your pigments are fine enough for a smooth application. If your particles are too large, they will scratch your paper and create an uneven texture. You can find incredible art supplies in unexpected household items, but for pigment grinding, you will want a few dedicated tools:
- A Glass or Porcelain Muller: This is a heavy, flat-bottomed tool used to grind pigment into the binder.
- A Glass Slab (or a heavy ceramic plate): This serves as your "mulling slab." It must be non-porous so you can clean it thoroughly between colors.
- A Small Scale: Precision is key. Measuring by "eye" is a recipe for frustration.
- A Fine Mesh Sieve: To ensure your pigment is as fine as possible.
- Distilled Water: Tap water contains minerals and impurities that can react poorly with your organic pigments.
The Step-by-Step Process of Pigment Alchemy
Making your own paints is a slow process. It requires patience, a steady hand, and a willingness to experiment. Follow these steps to create your first batch of professional-grade watercolor.
Step 1: Preparing the Pigment
If you are using raw minerals or dried organic materials, your first task is to reduce them to an ultra-fine powder. If you are using a pre-made pigment powder, you can skip this, but I highly recommend passing it through a fine mesh sieve to remove any large clumps. The finer the grind, the more luminous your final paint will be.
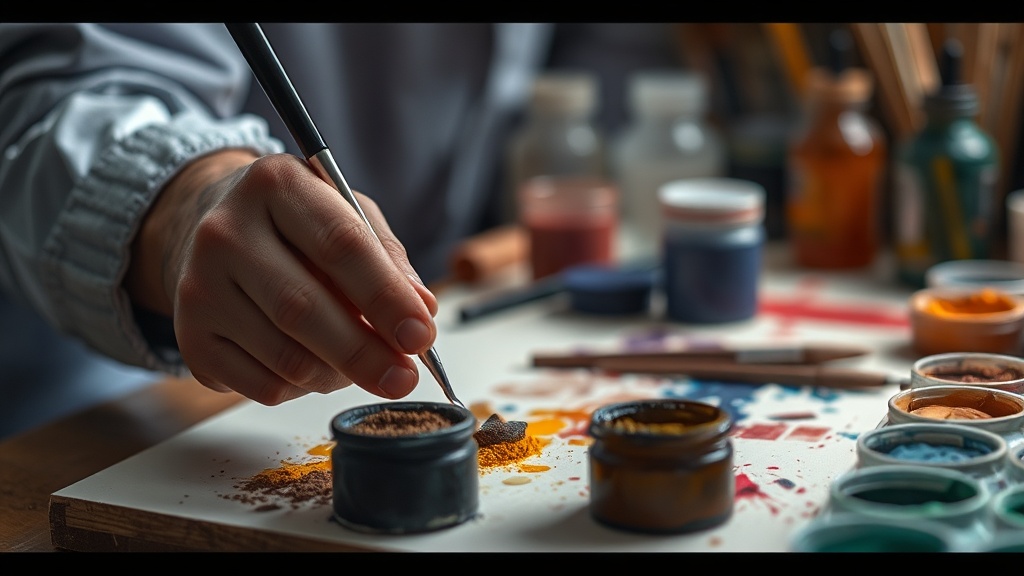
Step 2: The Muling Process
This is the most meditative part of the journey. Place a small mound of your pigment on the center of your glass slab. Create a small "well" in the center of the pigment pile, much like you would with an egg yolk. Pour a small amount of liquid—this could be a concentrated solution of Gum Arabic and distilled water—into that well.
Using your muller, begin grinding the pigment into the liquid using a circular, figure-eight motion. Do not just stir; you must grind. You are using the weight of the muller to crush the pigment particles into the binder. This process, known as mulling, can take anywhere from fifteen minutes to an hour depending on the coarseness of your material. You are finished when the mixture feels silky and no longer feels "gritty" against the glass.
Step 3: Testing the Consistency
A perfect watercolor should have a certain "body." It shouldn't be as thick as oil paint, but it shouldn't be as thin as water. Once you think you have reached the right consistency, take a small amount on a brush and test it on a scrap piece of watercolor paper. Observe how it dries. Does it leave a chalky residue? If so, you need more binder. Is it too transparent and weak? You may need more pigment.
Step 4: Setting the Paint
Once you are satisfied, you can transfer your paint into small, airtight containers or even into small plastic pans. If you want to create "pans" (the hard, dried squares seen in professional kits), you can add a tiny drop of honey or glycerin to the mix. This acts as a humectant, preventing the paint from becoming too brittle and cracked once it dries, making it easier to "reactivate" with a wet brush later.
The Art of Color Theory and Experimentation
Once you have mastered the physical act of making paint, the real fun begins: seeing how these colors behave. Because hand-crafted pigments often have different chemical properties than synthetic ones, your traditional color mixing rules might shift slightly. This is the perfect time to revisit mastering the art of color mixing with primary palettes. You will find that your hand-made ochres or charcoal blacks interact with light in ways that a store-bought tube simply cannot replicate.
When working with these custom colors, pay close attention to transparency and opacity. A hand-ground earth pigment might be naturally more opaque, which changes how you approach mastering the art of glazing with watercolor. Glazing is the process of layering thin, transparent washes to build depth, and knowing exactly how much light your pigment allows to pass through is the secret to professional-level luminosity.
"The artist who knows the origin of their color is an artist who truly understands the weight of their brushstroke."
A Note on Sustainability and the Natural World
There is a profound sense of harmony in creating your own supplies. When you source your own pigments—perhaps from charcoal, certain clays, or even botanical extracts—you are engaging in a more sustainable form of art-making. This connection to the earth is something I find deeply rewarding. Much like mastering the alchemy of indigo through natural dyeing, making your own pigments allows you to feel the seasonal shifts and the geological reality of the world around you.
If you find yourself drawn to these more elemental, "slow art" movements, you might also enjoy exploring capturing sunlight on fabric with cyanotype. Both practices reward the artist who is willing to step away from the instant gratification of the modern world and embrace the slow, beautiful process of creation from the ground up.
Troubleshooting Common Issues
Don't be discouraged if your first batch isn't perfect. Pigment making is a learning curve. Here are a few common hiccups:
- The paint is too "streaky": This usually means the pigment wasn't ground finely enough. Continue mulling for a longer period.
- The paint is drying too fast/cracking: You likely used too much Gum Arabic or not enough water. Add a tiny drop of glycerin to help retain moisture.
- The color looks dull: This can happen with certain organic pigments that are light-sensitive. Always test a small patch and let it dry completely before deciding if the color is "right."
The goal isn't perfection; the goal is understanding. When you know exactly what is in your paint, you are no longer just a user of a tool—you are a master of your medium. Go forth, get your hands a little dirty, and start creating your own spectrum.